Introduction
Your software project often changes. Each time you commit a change, you’re adding value to your project. Whether it’s refactoring code, adding new features, or even removing features. Separating changes from your stable code allows you to manage your project better. You can do this with the use of branches.
Why branches?
By using branches, your development happens independently of changes in the trunk or other branches. The changes made in a branch will only affect that branch, allowing you and your team to work in parallel without interruption or conflicts. When your entire team adopts this practice, you can easily track new features and bug fixes in your project.
In our guide on Using Branches in Subversion the team at Realmac Software covered a best practice workflow for using branches in Subversion. In this guide, we’ll demonstrate how you can use that workflow directly in Beanstalk without ever touching the command line.
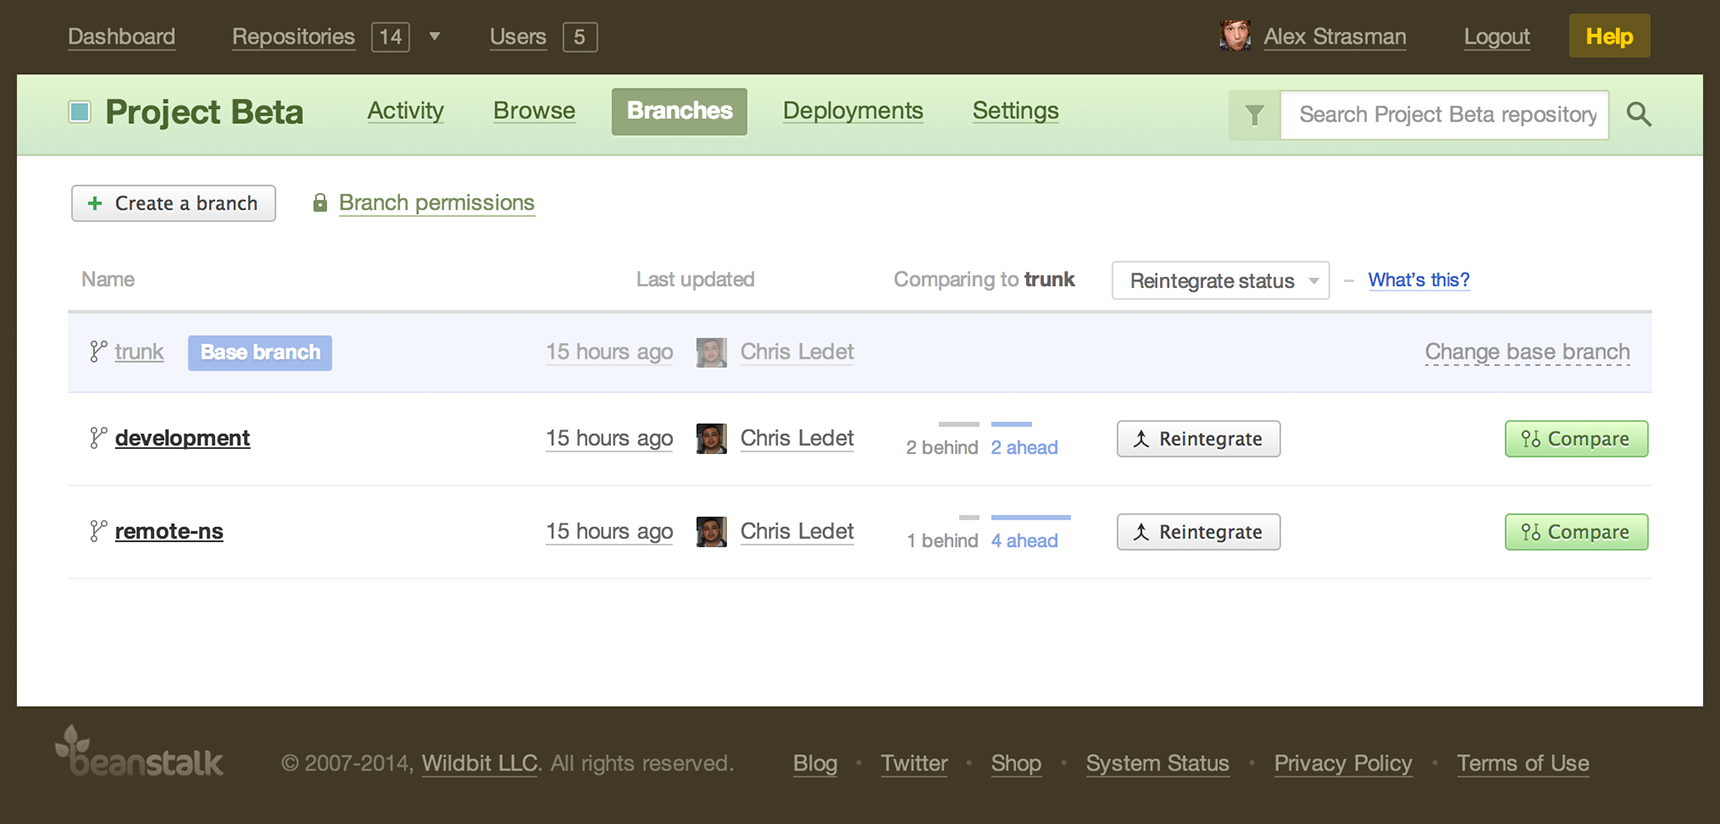
Branch page
Beanstalk provides tools to easily manage your branches in your repository. Within each repository, the Branches page will give you a high-level overview of the branches (including trunk) with an easy to use interface. This page is the gateway to reviewing changes to your project. You can create, delete, merge, and even compare branches, all in a single place.
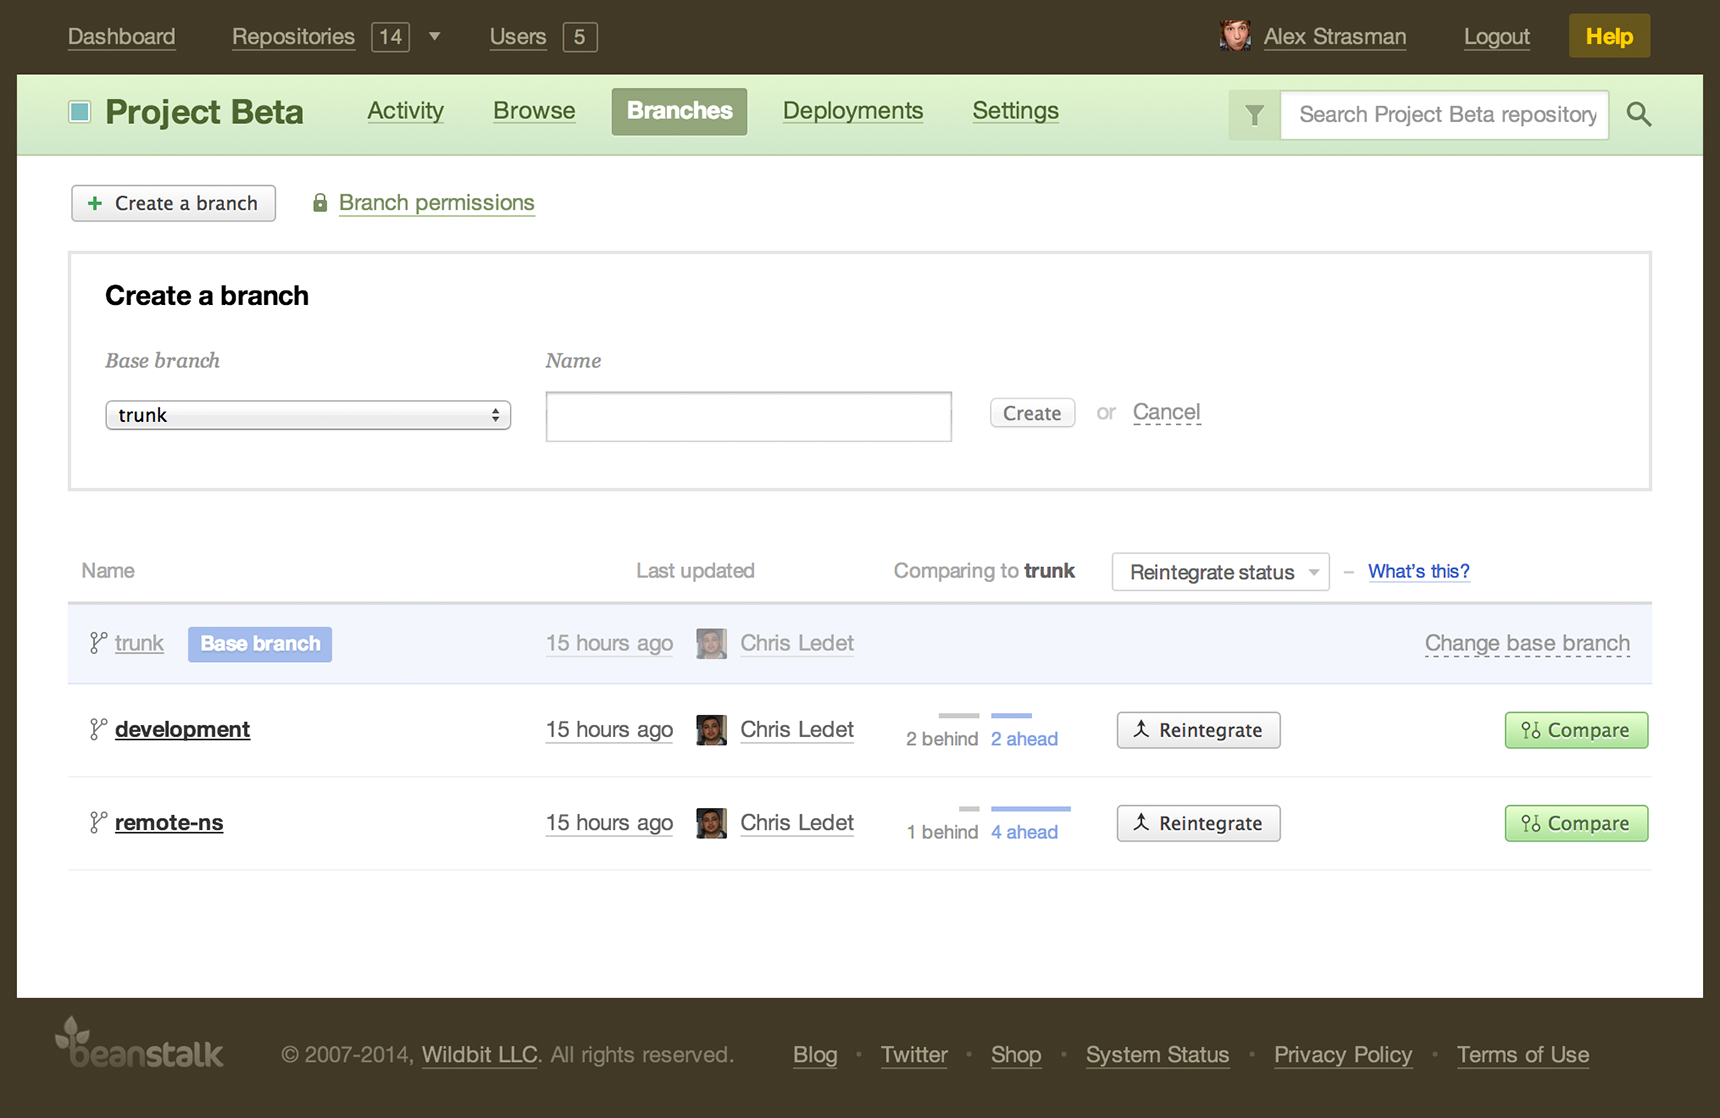
Creating a branch
On the Branches pages, you can quickly create a new branch from another branch. Creating a new branch is pretty straight-forward. Just enter a name of the new branch and then click “Create”. If you do not want the new branch based off the default branch, you can select a different branch from the branches dropdown. The new branch will be a copy of the currently selected branch. When the new branch is successfully created, you are redirected to that branch in Beanstalk’s code browser.
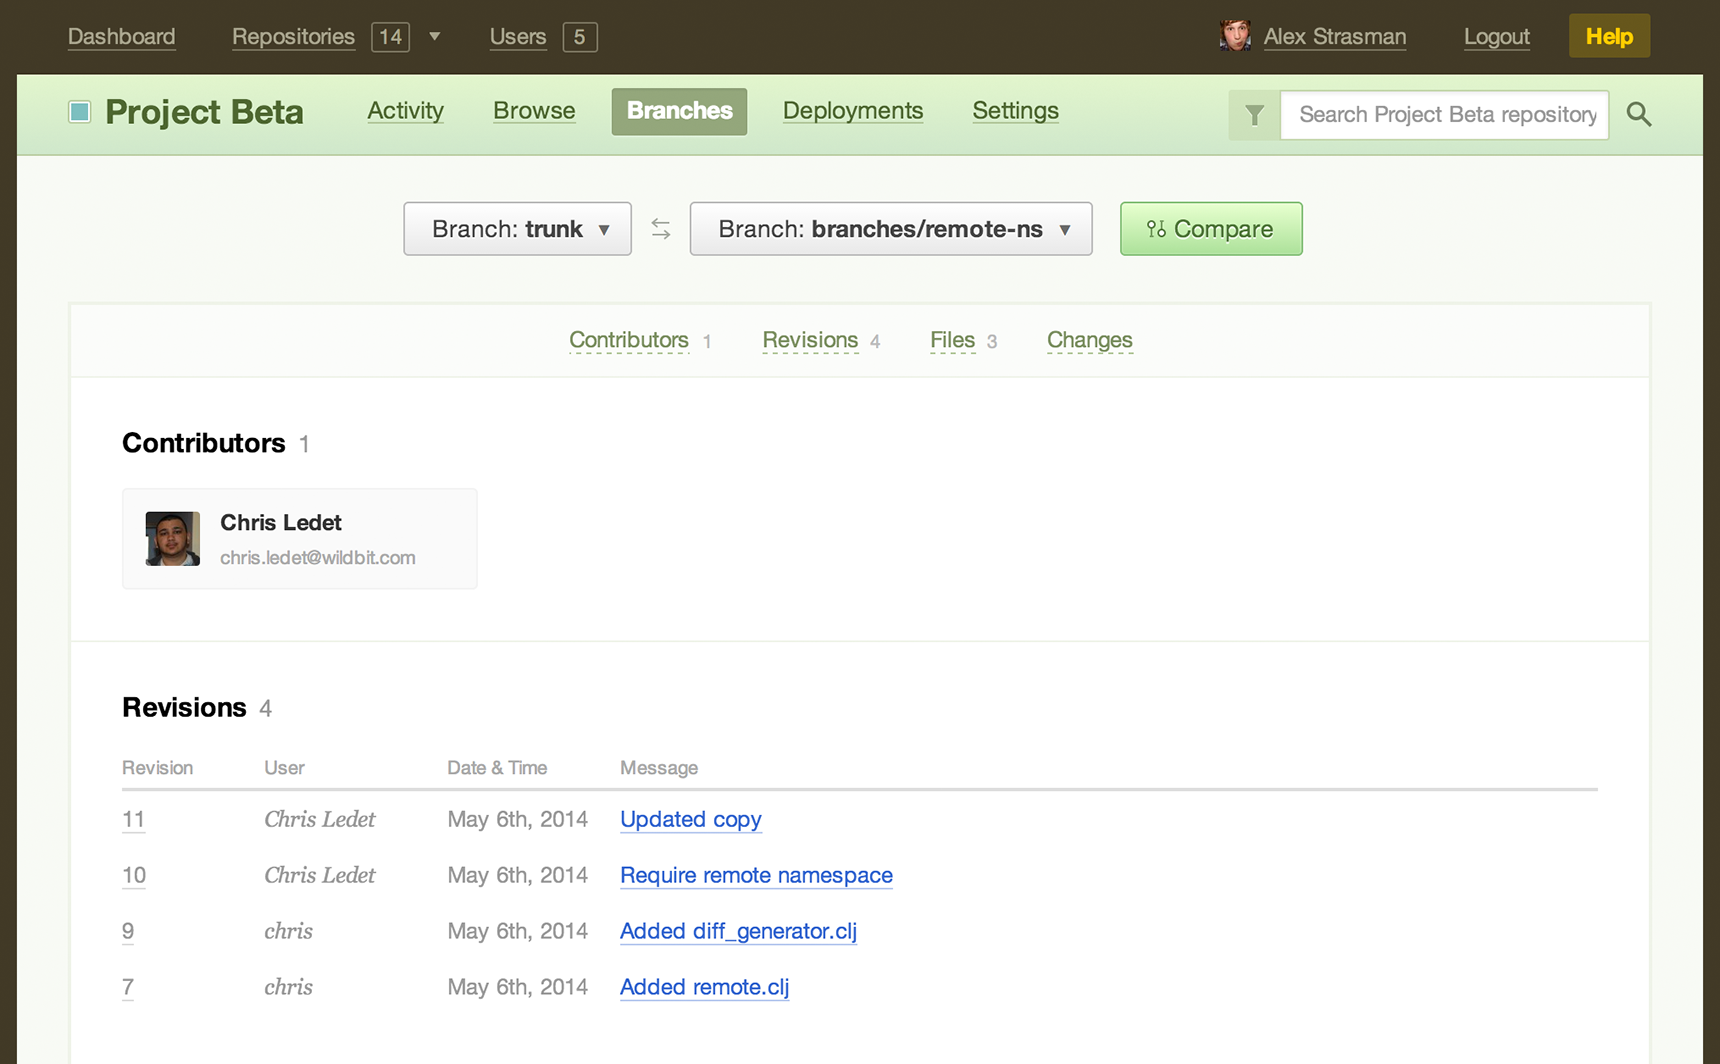
Comparing branches
With Compare, Beanstalk allows you to view a detailed list of differences between two branches. On the Branches page, you can compare any branch to the base branch. When you compare branches, it shows a summary of the changesets, contributors, integration tickets, and file changes between the two branches. Compare is crucial to the branch workflow as it allows you to view differences between branches before you merge them, reintegrate or deploy changes. You can quickly spot problems or review changes to improve code quality and reduce the chances of conflicts. In addition, Compare keeps you and your team informed about what has changed and what to expect without any communication overhead.
Merging branches
When you are ready to release a feature or bug fix, the process begins by taking your changes and applying them back into your stable code. This is the merge process. On the Branches page, you’ll notice a dropdown in the merge column. You can select two different types of merges for your branches. Merge and Reintegrate merge.
Merge will trigger a sync merge, which is used when you want to fetch all of the latest changes made on your parent branch (e.g. trunk). Using sync merge will keep your feature branch up-to-date with the parent branch. Subversion uses merge tracking to skip any revision that was previously merged.
For example, let’s say as you are developing a large feature, more and more changes are being committed to trunk from the rest of your team. By merging in the changes from your stable branch, you minimize the chances of conflicts and ensure that your code will be compatible with the latest updates. If you are working on a long running feature or branch, it is highly recommend that you sync merge often.

Reintegrate merge is used when you want to merge a feature branch into the originating branch. This is normally used when you are ready to deploy a new feature and you want to merge your work back into the stable branch. This is most likely your default branch (e.g. trunk) or another feature branch. Once the reintegrate merge is complete, all work from your branch will be merged into the originating branch for others to use. This is usually the point where your changes are deployed to your servers.
After the reintegrate merge, the feature branch can not be synced to the parent branch again without conflicts. Because of this, the branch must be deleted once the merge is finished.

Cleaning up branches
Once you are finished with a branch, it’s a good practice to remove it from your repository. Only keeping active branches around will reduce complexity of your repository. It will also allow your team to easily review what’s currently being worked on. In Beanstalk, you can delete a branch only after it has been sync merged into the parent branch. Branches that have been reintegrated are automatically deleted in Beanstalk.
Branch permissions
In some cases you may want to control who has access to merge changes into a branch. For instance, as part of your code review policies you may have people on the team who are required to conduct a code review before a branch is merged into trunk and deployed to your servers. With branch permissions in Beanstalk, it is possible to set specific write access permissions for certain people on your team, restricting commit and merge access to them specifically. To restrict branch access, simply visit the repository permissions page under Settings > Permissions. Keep in mind that only the account owner or admin can access these settings.
Further Reading
If you are interested in how merging works behind the scenes, check out the Version Control with Subversion e-book which contains advanced topics for branches and merges. You can also read our in-depth guide on Developing and Deploying with Branches.