Setting up Git can be tricky on Windows compared to Linux or Mac, but if you follow the steps in this guide, you should have no problems using Git on Windows. We’ve done the hard work and chosen between the multiple options at key steps to help make things easier for you. This guide will take you through the steps to install and configure Git and connect it to remote repositories to clone, push, and pull. If you don’t have one already, create a Beanstalk account.
Choosing a Git distribution
There are two competing Git packages for Windows: a Cygwin-based Git and a version called msysGit. We will describe how to install the msysGit package. We recommend installing msysGit because we’ve found it’s easier to work with than the Cygwin based installation.
Installing Git
Once you have downloaded the msysGit executable, double click on it to start the installation wizard. Leave the default directory options. When you get to the “Adjusting your Path environment” setting, select the “Run Git from the Windows Command Prompt” option. Choosing this option will make it easy for you to run Git commands from the Windows Command Prompt (command line) if you choose. Command Prompt is a simple tool, where you can run commands, switch through folders, manage files and it can be ran by selecting Run… in Start menu, and executing cmd command.
You will notice that for the rest of this article we will use Git Bash for running Git commands. The Git Bash tool works in the same way as the default Windows’ Command Prompt, but has some special features. With Git Bash you’ll be able to use a number of UNIX command line tools along with access to Git, and we recommend it since it’s often simpler to use than the Windows Command Prompt.
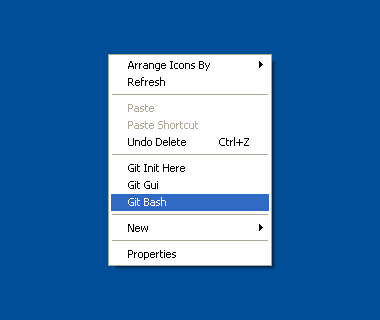
You can run it by right clicking your mouse on the desktop, and selecting Git Bash from pop up window.
When you reach the step “Configuring the line ending conversions”, make sure to leave the option “Checkout Windows-style, commit Unix-style line endings” selected. This option makes sure that Git converts LF to CRLF when checking out text files. When committing text files, CRLF will also be converted to LF. This is a compatibility measure to protect newlines in text files, allowing you to easily work with text files on Windows and on Unix-style platforms.
Important note: The most common problems when setting up Git on Windows are related to SSH keys. Git uses SSH keys to securely access your repositories, and in Windows SSH keys are often searched on the wrong path when you try to use Git.
If you use an older version of msysGit, you may encounter a step called “Choosing the SSH executables”. If you encounter that dialog, we recommend that you choose the “Use OpenSSH” option.
After you have successfully installed Git on Windows, you’ll need to provide secure communication with your Git repositories by creating and installing SSH keys.
Installing SSH keys on Windows
To access your Git repositories you will need to create and install SSH keys. You can do this in two ways:
- by using OpenSSH (generating SSH keys with
ssh-keygenwhich comes with Git) - by using PuTTY (free Telnet and SSH client)
OpenSSH and PuTTY are free implementations of Telnet and SSH for Windows. They encrypt all traffic and provide secure communication with your remote Git repositories by using SSH keys.
We recommend OpenSSH over PuTTY, and it’s installed with your Git copy. PuTTY is recommended only for advanced users who are already familiar with how Git with SSH keys work.
Using OpenSSH and generating SSH keys with ssh-keygen
To communicate with the remote Git repository in your Beanstalk account from your Windows computer, you will need to generate an SSH key pair for that computer. This process requires only a few steps, but you do first need to install msysGit using the full installer as described above.
Generating a key pair
To do this you need to run Git Bash, which can be found in your Start menu. Run the command:
ssh-keygen -t rsaIt will ask for location and pass phrase. Accept the default location (usually C:\Documents and Settings\username\.ssh\ or C:\Users\username\.ssh) by pressing Enter. After that, make sure to set a strong pass phrase for the key.
Now that the keys are generated, open the file id_rsa.pub (found in the default location from the previous step) with a text editor. The contents of this file is your new public key. If you copy it to your clipboard, you can add it to your Beanstalk profile (under the Profile and Settings → Keys= section).
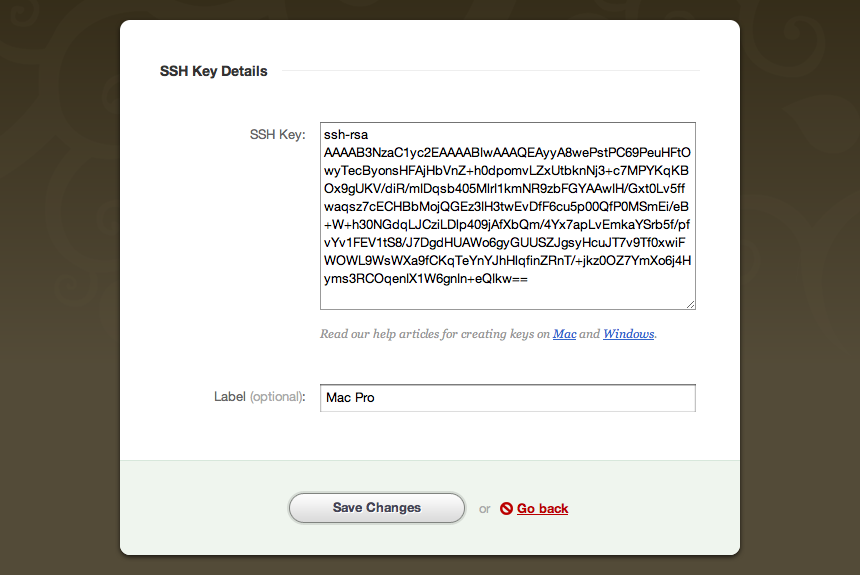
Your SSH public key should look something like this:
ssh-rsa AAAAB3NzaC1yc2EAAAABIwAAAQEAyyA8wePstPC69PeuHFtOwyTecByonsHFAjHbVnZ+h0dpomvLZxUtbknNj3+
c7MPYKqKBOx9gUKV/diR/mIDqsb405MlrI1kmNR9zbFGYAAwIH/Gxt0Lv5ffwaqsz7cECHBbMojQGEz3IH3twEvDfF6cu5p
00QfP0MSmEi/eB+W+h30NGdqLJCziLDlp409jAfXbQm/4Yx7apLvEmkaYSrb5f/pfvYv1FEV1tS8/J7DgdHUAWo6gyGUUSZ
JgsyHcuJT7v9Tf0xwiFWOWL9WsWXa9fCKqTeYnYJhHlqfinZRnT/+jkz0OZ7YmXo6j4Hyms3RCOqenIX1W6gnIn+eQIkw==
Mac Pro
In your Beanstalk account, SSH key would look like this:
After you have setup the SSH key on Beanstalk, you should be able to check a connection and then push or pull with your remote Git repository. In case you have trouble with SSH keys check $HOME path in your Windows operating system. Some other software can change HOME or HOME_PATH environment variable to point to different location, instead of your real home (Documents and Settings) directory.
Checking your connection
Before trying to access your Beanstalk repository, check if the connection to your remote repository works. In order to do that, run Git Bash, and enter this command, replacing accountname with your account name:
ssh git@accountname.beanstalkapp.comIn this case, this is the URL to access Git on your Beanstalk account. If you are using another version control hosting service, the URL would be provided by them.
When authenticating or later when trying to connect to Git repository most likely you will encounter a message that looks like this:
The authenticity of host 'accountname.beanstalkapp.com (204.232.132.2)' can't be established.
RSA key fingerprint is 30:9a:97:f3:19:4f:d1:6e:28:76:9e:e7:d1:df:2c:31.
Are you sure you want to continue connecting (yes/no)?
You can type yes and press Enter, which will add your account’s hostname accountname.beanstalkapp.com to a known_hosts file. This step won’t need to be repeated later, unless your public key or your account names changes.
If you were authenticated correctly, you will see a message similar to this one:
You were successfully authenticated as [emailaddress] in accountname.beanstalkapp.com.You can now continue to configure your local Git profile.
In case you have installed TortoiseGIT
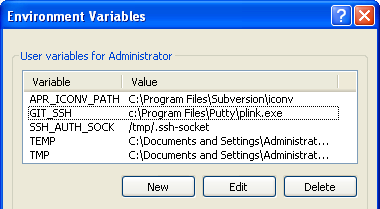
If you have ever installed TortoiseGit on the computer you’re setting up your keys on, you may encounter problems. TortiseGit creates an environment variable that configures Plink as your SSH keystore, which may conflict when you try to use Git and SSH. No matter how you change your config or uninstall TortoiseGit, that environment variable persists and until you delete it, Git will not look to your regular .ssh directory to find the proper key.
In our case environment variable looked like this: GIT_SSH=c:\Program Files\Putty\plink.exe. Environment variables can be found here:
- Windows XP: Control Panel → System Properties → Advanced → Environment variables
- Windows 7: Control Panel → System → Advanced system settings → Environment variables
Having problems connecting to your Git repository on Windows 7?
Our users have reported problems when generating SSH keys on Windows 7 systems. If that happens for you, try generating your SSH keys on Windows XP if possible. After generating the private and public keys (following the steps to generate keys are provided above in the Generating a key pair chapter), copy the files to default SSH keys location in Windows 7 (usually C:\Documents and Settings\username\.ssh\ or C:\Users\username\.ssh).
Alternative to OpenSSH — using PuTTY to access your Git repository
Installing Git and using PuTTY to connect to your Git repository can be troublesome, so we recommend that you use the OpenSSH method which we described in the steps above. Using OpenSSH is simple and straightforward, but if OpenSSH is not an option, or for some other reason you prefer to use PuTTY to connect to your repositories, here is a step by step guide on how to do so.
Like OpenSSH, you will generate SSH keys and use them to communicate with your remote Git repositories, only now you will use PuTTY’s tools for generating, storing, and using the keys.
Installing PuTTY
You can download the PuTTY installation package and run it. The latest installation package at the moment of writing this article is putty-0.60-installer.exe which can be found under “A Windows installer for everything except PuTTYtel” heading.
Install PuTTY to the default recommended location, typically c:\Program Files\PuTTY\. Once installed, navigate to the installation folder where you will find:
plink– a command-line interface to the PuTTY back endsputtygen– an RSA and DSA key generation utilitypageant– an SSH authentication agent for PuTTY, PSCP and Plink, in which we will store keysputty– the Telnet and SSH client
You will also find some other files, but for this guide you only need to know about plink, puttygen, pageant and putty.
Adding GIT_SSH variable to environment
After you have installed PuTTY package, you’ll need to add a GIT_SSH variable to your environment variables which should point to the plink.exe file (including its entire path). Accepting our defaults from above, this will likely be: GIT_SSH=c:\Program Files\Putty\plink.exe
Environment variables can be found and created/edited here, depending on your version of Windows:
- Windows XP: Control Panel → System Properties → Advanced → Environment variables
- Windows 7: Control Panel → System → Advanced system settings → Environment variables
Generating SSH key with puttygen
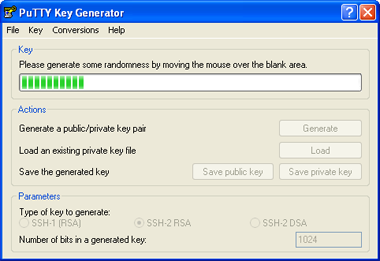
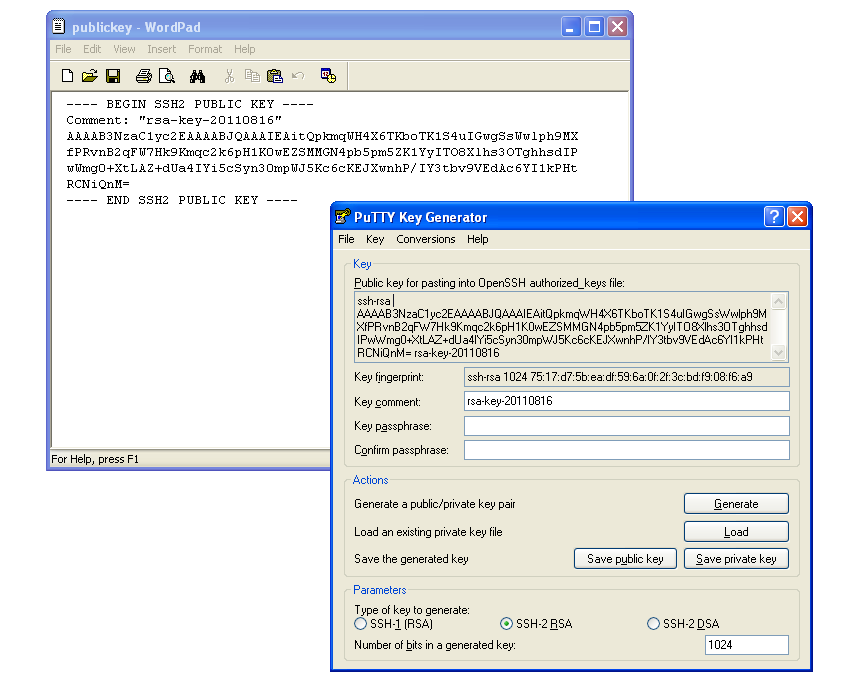
After setting up the environment variable, you need to generate and save SSH keys with puttygen. Run puttygen.exe, which will allow you to generate a SSH-2 RSA public/private keypair. Once generated, save the public and private keys to a folder of your preference, just make sure to note the folder where the keys are shared. Easiest way to remember which is the private/public key is to name them private and public so you can distinguish them later.
Before leaving puttygen, copy the public key to your clipboard and paste it into your version control hosting account (in Beanstalk, under the Profile and Settings → Keys section).
Please note that when you generate a key with puttygen, the public key that you copy from puttygen and the public key you save to a file for later use are not in the same format. You can see on the picture below that the public key was saved with new lines and without the “ssh-rsa” keyword. In order to copy and paste the public key to Beanstalk, you need to copy it in the same format as it was when it was generated by puttygen. That format should be: “ssh-rsa keycodegenerated”. All you need to do is modify your key in an editor like Notepad, and then add it to Beanstalk.
Adding your private key to pageant
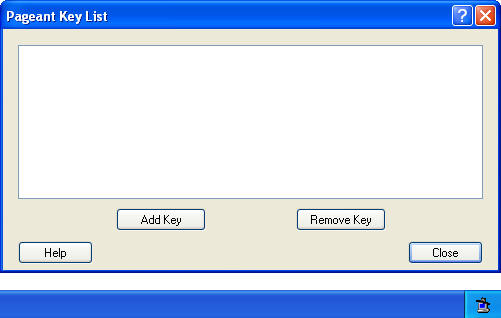
After you have generated the SSH keypair, you need to add the SSH private key to pageant, PuTTY’s key management tool. First, run pageant, which can be found in the directory where you have installed PuTTY package (remember, by default: c:\Program Files\PuTTY\). You will see a small icon in your system tray (see the screenshot to the right), which indicates pageant is started. Click on the icon and in pageant window click “Add Keys”. Add the private key that was generated by puttygen in the previous step. The private key has extension .ppk, that is the easiest way to distinguish it from the public key you have created.
After you add the SSH key, you should see it in pageant key list.
Checking your connection
Once you have finished setting up PuTTY, all you need to do is check if the connection to your remote hosted Git repository works if you installed Git.
If you still haven’t installed Git download the msysGit executable, double click on it and the installation wizard should start. Leave the default directory options. When you get to the “Adjusting your Path environment” setting, select the “Use Git Bash only” option. Choosing this option will help you avoid path conflicts.
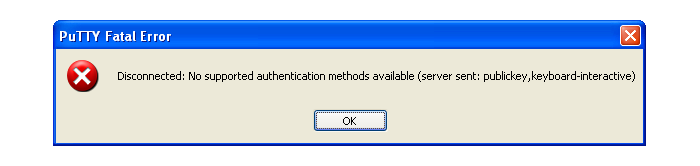
After you have installed Git run Git Bash and go to the directory where you have installed PuTTY and try to access your repository by typing this:
set Git
putty git@accountname.beanstalkapp.com:/gittreponame.git
If you are not authenticated correctly, a message like the following screenshot will pop up:
If you are authenticated correctly, a new window will pop up with message like this:
Using username "git"
Authenticating with public key "rsa-key-20110518" from agent
Pop up window will close shortly after authentication is finished, which means authentication was successful and you should be able to manage your Git repositories from now on.
Setting up Git profile
After you have authenticated correctly by installing Git and setting up SSH keys, before you start using your Git repositories, you should setup your Git profile by typing following after you run Git bash in command line:
git config --global user.name "Firstname Lastname"
git config --global user.email "your_email@youremail.com"
In case you are using Beanstalk for version control, it would be best if your first name, last name and email address match to the ones you use in your account to avoid any conflicts.
Summary
In order to be able to use your repository you need to:
- Install Git
- Generate SSH keys with PuTTY or ssh-keygen
- Put keys in correct place (in pageant for PuTTY, in correct
.sshfolder for OpenSSH) - Check if connection to the Git repository is working
- Setup your Git profile
While setting up Git the most common mistakes include mismatched private and public SSH keys or the user doesn’t have permission to access the repository. If you run into any issues connecting to Beanstalk, don't hesitate to contact us using the links below.
Now what?
Now that you have Git properly installed and configured, you can use a client of your choice. Whether you choose a terminal or a GUI, it is a good idea to learn the basic concepts and commands for versioning your files before. Here’s some recommended reading to get you started:
- Git Immersion Tutorial – an excellent step-by-step tutorial to using Git
- Pro Git E-book & Printed Edition
- The Git Parable – understand the concepts behind Git with a simple story by Tom Preston-Werner